The only difference between a muffin and a cupcake is your conscience. Today with a whiny baby on my hip, I decided to whip up some delicious banana oatmeal chocolate chip muffins with a few super shriveled, really sad, and not at all phallic bananas. Well, at least not the phallic I’m familiar with. (that was a shout out to you, Aaron)

Anywho, if you love muffs as much as I do, you should eat these. Don’t fool yourself, they’re practically a cupcake. But if you enjoy denial as much as I do, you’ll probably enjoy these muffins as well. Whip ’em up and see what happens! I dare ya…
20130406-123817.jpg

•4 bananas smashed (I use my standing mixer with the paddle attachment)
•1/2 C brown sugar
•1/2 C vegetable oil (or sub applesauce, this is what I do)
•1 egg
•3 tsp vanilla
•2 C flour
•pinch of salt
•1 tsp baking powder
•1 tsp baking soda
•1 C oats (I use old-fashioned, but instant will also work)

20130406-124659.jpg (whoops, bananas not shown…this was an afterthought)

Preheat your oven to 325°.
Line your cupcake pan (or muffin tin if you feel better about yourself this way) with liners, you’ll be glad you did.

No need for any fancy instructions on my part. Just start from the top of the ingredients list and finish at the bottom, adding each in order. I use a KitchenAid stand mixer with a paddle attachment, but a good old-fashioned bowl and spoon will do the trick…I don’t judge. (If it makes you feel any better, Aaron scored my KitchenAid on craigslist for $50, so I’m no rich bitch!) <– second shout out to Aaron!

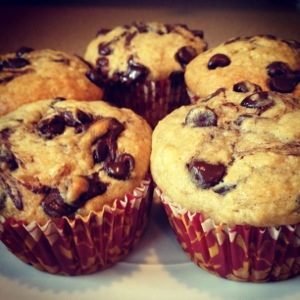
I used a 1/3 cup measuring cup to scoop out my batter and fill each muffin slot. I suppose they ended up being about 3/4 of the way full?

Now sprinkle about 6 to 8 chocolate chips on top of each muffin, do NOT mix them in yet.

Go ahead and throw your muffin tin into your preheated oven, but only for about two minutes max. Take the muffins out, and using a toothpick, chopstick, or good old-fashioned knife, swirl those chocolate chips into the batter just a touch. They will stay whole, but also give you that pretty chocolate swirl effect.

Back in the oven they go, for 25-28 minutes. They will have a light golden brown top, and if you were feeling extra scared, you could stick a toothpick in the middle of your center muffin to check for doneness.

Voila!
20130406-124828.jpg20130406-124846.jpg<img src="http://.

20130406-125440.jpg

So time and time again, I’ve posted pics of the easiest roasted chicken you could ever dream of on IG, and the response is always “recipe please!”.

I’m no pro, although I do love to dabble in daily cooking and concoctions galore. I rarely use recipes. I find that I all too often lose my place, my iPhone screen goes to sleep so I’m left to reawaken it with sticky/greasy/wet fingers, or I get impatient and skip past the “steps” meaning the end result isn’t quite right. I’m not sure what the solution is here, other than to just “wing it”, so that’s just what I do. I’ll still put dishes displayed here in a recipe form, just because I’m not sure I’m important enough to reinvent the wheel…yet 😉 But I’ll try to be as simplistic and direct as possible, using terms that would normally come out of my mouth. Think of it as a “to-do” list. Capiche?

Without further ado, here is the before and after with a whole handful of steps in between.

20130404-200617.jpg

Start off by preheating you oven to 375 degrees.

Rinse your chicken and pat it dry (frankly I don’t care if it’s free range, organic, etc; of course we all prefer the best, but you’ll find with me that we’re a family on a budget and I won’t get all preachy about everything being top of line in order to be delicious or acceptable).

Quarter one small onion and smash 3-5 cloves of garlic, depending on size. Place these two items into the cavity of the bird.

Tuck the wings under the back of the bird and tie the legs together if you prefer (this will keep it more compact, thus creating even roasting, but it won’t be ruined otherwise).

In a small dish, soften 2 Tbsp of butter for 10-15 seconds in the microwave. Add whatever seasonings you enjoy, I tend to like rosemary, thyme, parsley, garlic salt, poultry seasoning, salt and pepper. Mix with a fork until blended. Eyeball the amounts, nothing technical here.

Using your fingers (gross, I know) rub the butter mixture onto the skin of the chicken. Dry skin is vital here.

Place the bird on a cookie cooling rack in a roasting pan (or directly in the roasting pan if you’re without the rack; again, it won’t ruin your life).

Roast for 20 minutes per pound. I like to remove it every 20 minutes to baste with the juices in the pan. Really, you’re looking for 180 degrees when you insert your meat thermometer into the thick part of the thigh and the juices run clear.

That’s it. Now eat it.

Here’s our final plate with roasted asparagus and feta, and garlic-butter egg noodles. Easy peasy! And for the record, only half of this was eaten, but I had to plate it all for the effect of display 😉
Enjoy!

20130404-202948.jpg

I must admit I’ve been thinking of starting a blog for some time now. I am a part of a group of ladies on a pregnancy app (yes, I know, we just can’t let go) and I feel as though I always have something to say! Whether it’s on or off topic, I find that motherhood hasn’t dulled me down as much as I’d expected (good news for some, bad for others).

A few of those classy ladies I mentioned above have encouraged me to start spewing out my thoughts to the world in an organized fashion, thus, the idea of blogging. I figured, almost complete strangers from all over the world couldn’t be wrong, right? They must have a pretty good peg of who I am and what I’ve got to say. Makes complete sense to me.

Ultimately, I find myself being at home with my 6 month old babe, having a view, a voice and story to share with the outside world. So here goes nothin’ (but really though, hopefully something).